# Quick Start
This is real quick. Follow along, you will be viewing and editing the contents of a MySQL table with xCRUD on your browser shortly.
# Prerequisites
- You need to know how to use, and have installed or access to a PHP, MySQL and a HTTP (apache, lamp, wamp or xampp stack) server.
- HTML, Javascript, CSS knowledge is optional but nice to have for your projects later.
# Purchase xCRUD
Purchase xCRUD from xcrud.net (opens new window) and download the zip file.
# Project Init
For purposes of this quick start, i'll refer to my project directory D:\dev\xampp7\htdocs\crud_example on my local windows server from here on as crud_example.
Of course your project path and directory name can be whatever you need them to be.
TIP
This quick start guide should work for any other operating system with a PHP installation.
Extract the zip file into your project directory.
# Directory Structure
My project directory crud_example with only the xCRUD directory in it now looks as follows.
crud_example
    |- xcrud_1.7.0.7
        |- demos/           < Bundled demos
        |- demo_database/   < SQL for sample data to run the demos
        |- documentation/   < This documentation
        |- editors/         < Advanced editors used by xCRUD for demos
        |- integration/     < CodeIgniter integration examples
        |- 'Joomla! 2.5'/   < Joomla v2.5 integration plugin
        |- 'Joomla! 3.2'/   < Joomla v3.2 integration plugin
        |- patch/           < xCRUD patches
        |- READ_ME.txt      < Text junkies quick start
        |- roadmap.html     < If you're wondering about our plans
        |- uploads/         < xCRUD uploads directory
        |- V1.7.0.7.txt     < Current version changelog
        |- changelog.txt    < Full changelog
        |- WordPress/       < WordPress integration plugin
        |- xcrud/           < xCRUD core & configuration
WARNING
Do not rename anything inside the xCRUD directory crud_example/xcrud_1.7.0.7.
The appended version number may be different depending on the current version of the zip file downloaded.
# Database Configuration
Open the file crud_example/xcrud_1.7.0.7/xcrud/xcrud_config.php in your editor.
This file contains all xCRUD settings, most of which you can change during application initialization.
RECOMMENDATION
Use UTF-8 in your project. This will save you from a lot of problems with the encoding and localizations.
Find the lines below and edit appropriately.
public static $dbname = 'dbname'; //database name
public static $dbuser = 'dbuser'; //database username
public static $dbpass = 'dbpass'; //database password
public static $dbhost = 'localhost'; //database hostname
For this quick start, i will be using the xcrud.employees table. You can find it's definition and sample data in crud_example/xcrud_1.7.0.7/demo_database/xcrud_ver1.7_7_4_2020.sql.
You are free to use whatever MySQL database and table you have.
# FINALLY!! The Example
In your project directory, create the file crud_example/employees.php and copy the lines below into it.
<?php
include 'D:\dev\xampp7\htdocs\crud_example\xcrud_1.7.0.7\xcrud\xcrud.php'; //path to xcrud.php

$xcrud = Xcrud::get_instance(); //instantiate xCRUD
$xcrud->table('employees'); //employees - MySQL table name

echo $xcrud->render(); //magic
?>
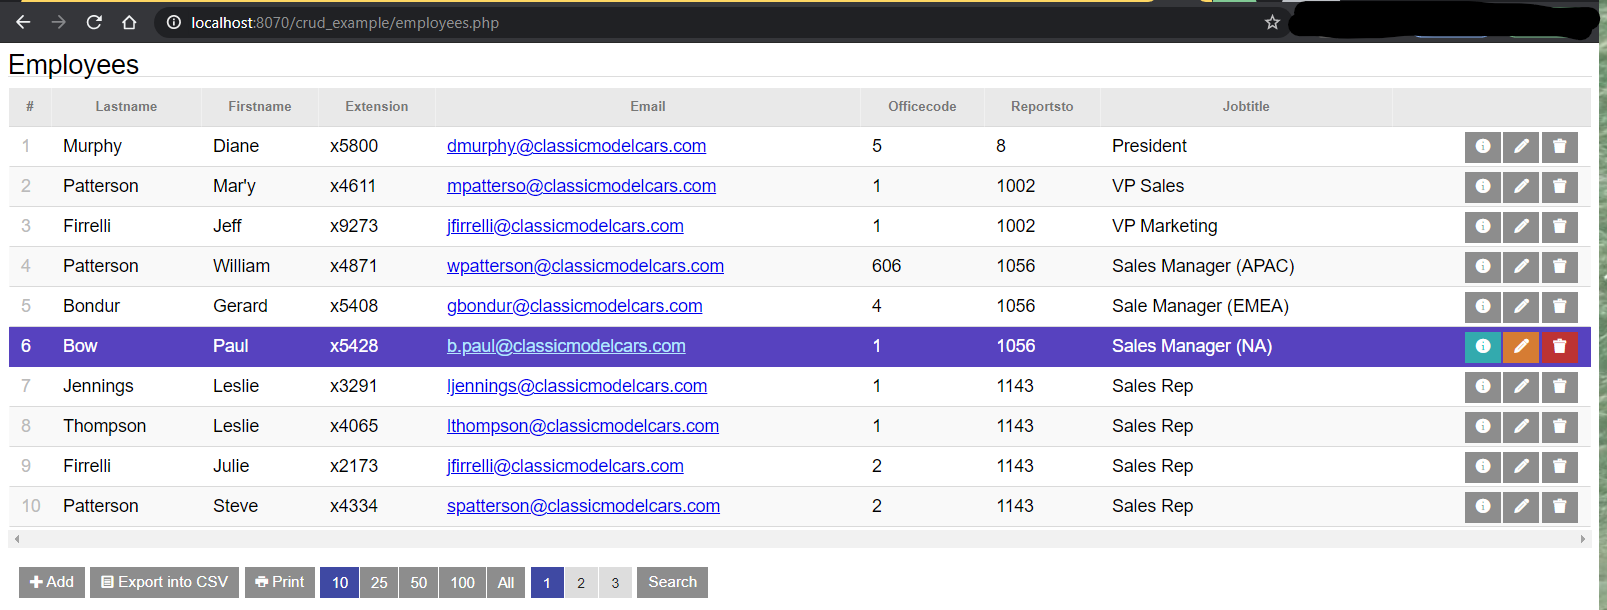
On my browser i can now navigate to http://localhost:8070/crud_example/employees.php (Your URL to employees.php may be different).
Below is a screenshot of the employees table rendered with view and edit capabilities running on the browser.

That's all.
# Bundled Goodies
# Run Demos Locally
The xCRUD zip file includes the demos/ and demo_database/ directories. Restore the databases as provided, then configure xCRUD as above.
On your browser, now navigate to http://localhost:8070/crud_example/xcrud_1.7.0.7/demos/ (Your URL to demos/ may be different). The same bundled demos are accessible online here. (opens new window)
Have fun.
We're constantly improving our documentation, do have a look at the navbar, up top, on this page.
# Run Docs Locally
On your browser, now navigate to http://localhost:8070/crud_example/xcrud_1.7.0.7/documentation/ (Your URL to demos/ may be different).
# Advanced Configuration
The configuration file (xcrud/xcrud_config.php) contains default settings, you can customize the behavior of xCRUD to your taste. The configuration file is well commented, you should not have any problems with the editing.
RECOMMENDATION
Use UTF-8 encoding during editing saving you from a lot of problems with the encoding and localizations.